TG-Notify ist eine von mir geschriebene Erweiterung für Check_MK welche Notifications über Telegram ermöglicht und über Callback Acknowledge und Downtimes setzen kann für Hosts/Services.
Sourcecode: https://github.com/lanbugs/tg-notify
Status/ Version: 0.1 beta
Download als MKP: folgt
Lizenz: GPLv2
Vorteile:
- Telegram ist kostenlos
- Telegram ist für alle gänigen Mobile und PC OS verfügbar -> https://telegram.org/apps
- Telegram arbeitet mit einer HTTP API, unabhänig von E-Mail
- Direkte Callbacks möglich, implementiert sind Acknowledge und Downtime -> Super für Bereitschaft wenn es nichts dringendes ist um den Schlaf nicht lange zu unterbrechen
![🙂]()
- Für die Callbacks muss Check_MK nicht über das Internet direkt erreichbar sein
- mehr als 160 Zeichen möglich (vgl. SMS)
- uvm.
Geplant / Future:
- Eigene Ack / Downtime Texte
- Weitere Komandos (Ideen ??)
Installation TG-Notify
TG-Notify ist in Python geschrieben und kommt mit den Standard Libraries von Python 2.7 aus die von Check_MK in der OMD Umgebung bereitgestellt werden.
Verwendete Python Libraries:
- argparse
- ConfigParser
- sqlite3
- os
- sys
- urllib
- json
- datetime
- time
- random
- string
Bestandteile von TG-Notify:
- tg_admin – Admin Tool welches auch die Callbacks einsammelt
- tg_callback – Callback Tool welches die Notifications und Downtimes setzt
- tg_runner – Cronjob Script
- tg_notification_with_callback – Notification Script welches die Notifications aus Check_MK versendet
- tg.ini – Configdatei von TG-Notify
- tg.db – SQLite3 Datenbank welche mit dem tg_admin Tool generiert werden kann
- tg_collect_and_callback_agent, tg_cleanup – Cronjobs die ebenfalls mit dem tg_admin Tool generiert werden
Verzeichnisse -> Dateien:
- OMD_ROOT/local/bin -> tg_admin und tg_callback, tg_runner
- OMD_ROOT/local/etc -> tg.ini
- OMD_ROOT/local/lib/tg_notify -> tg.db
- OMD_ROOT/local/share/check_mk/notifications -> tg_notification_with_callback
- OMD_ROOT/etc/cron.d -> tg_collect_and_callback_agent, tg_cleanup
Schritt 1: Anlegen eines Telegram Bots beim BotFather
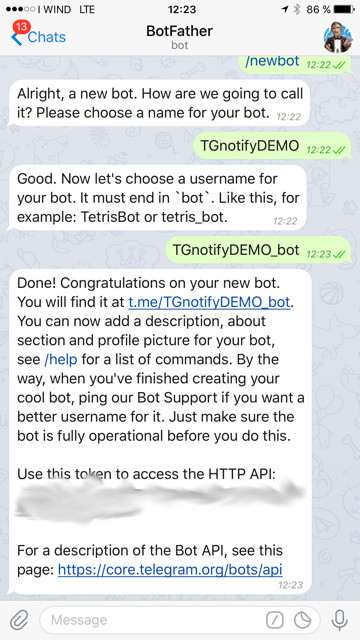
Message an BotFather schicken mit „/newbot“, anschließend Namen definieren für neuen Bot z.B. „TGnotifyDEMO_bot“. Der BotFather schickt anschlieend den Token für die HTTP API von Telegram.
Schritt 2: Anlegen eines Automation Users in Check_MK
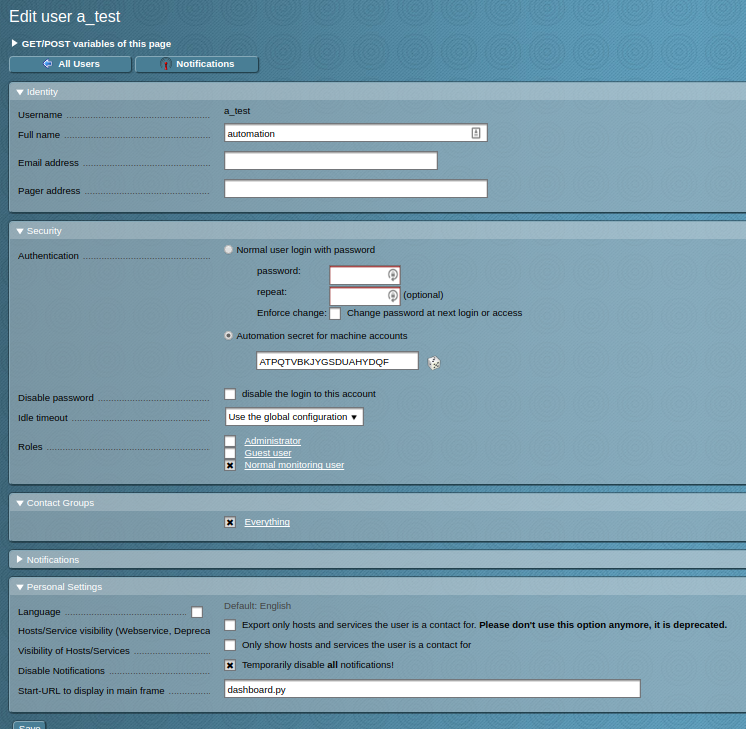
Damit die Callbacks ACKs und Downtimes setzen können muss ein Automation User eingerichtet werden. Der User muss als Contact Group die gleichen hanben wie die User sonst kann er keine ACKs/Downtimes setzen. Alternativ muss das Userprofil angepasst werden. Für den Automation User sind die Notifications zu deaktivieren!
Schritt 3: tg.ini anpassen
Hier ist der Token vom BotFather einzugeben und der Automation User sowie die URL zum Check_MK System.
;
; Configuration for  TG-Notify
;

[Telegram]
; URL mit /
url = https://api.telegram.org/
; Token with bot at the beginning, without / at the end
token = bot123456789:AAAAAbBbbbCCcCccDDddDdDEeEeEEEEeE-FFF

[Database]
; Relative to OMD_ROOT without / at the beginning
path = local/lib/tg_notify/
file = tg.db

[Check_MK]
url = http://localhost/dev1/check_mk/
automation_user = a_test
automation_pass = ATPQTVBKJYGSDUAHYDQF
Schritt 4: Datenbank generieren
Die Funktion ist in tg_admin eingebaut, dazu einfach „tg_admin –initialize-database“ aufrufen.
OMD[dev1]:~$ tg_admin --initialize-database
Schritt 5: Crontab generieren
Die Funktion ist in tg_admin eingebaut, dazu einfach „tg_admin –generate-cronjobs“ aufrufen.
OMD[dev1]:~$ tg_admin --create-cronjobs
Schritt 6: Neuen User anlegen in TG-Notify
TG-Notify hat seine eigene Userdatenbank, es müssen die Check_MK User <-> Chat_ID von Telegram TG-Notify erst bekannt gemacht werden.
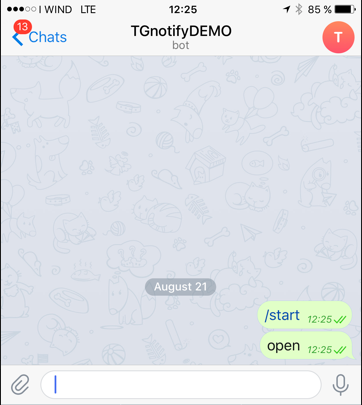
Dazu vom Handy ein „open“ an den Bot senden und das Kommando „tg_admin –show-agent“ aufrufen. Es wird die entsprechende Chat_ID angezeigt die der User hat. Anschließend den User mit „tg_admin -c -u hdampf -i 123456789“ anlegen. Aktuelle User können mit „tg_admin -s“ abgefragt werden.
OMD[dev1]:~/local/etc$ tg_admin --show-agent
----------------------------------------------------------------
First Name: Hans
Last Name: Dampf
CHAT ID: 123456789
----------------------------------------------------------------

OMD[dev1]:~/local/etc$ tg_admin -c -u hdampf -i 319651791

OMD[dev1]:~/local/etc$ tg_admin -s
Current User:

Username    Chat_ID
------------------------
hdampf      123456789
Schritt 7: Neue Notification Rule erzeugen für TG-Notify
Nach der Installation von TG-Notify umbedingt einen „omd restart“ durchführen damit das neue Notifications Script gefunden wird von Check_MK. Die Regel wie gewohnt erstellen, hier im Beispiel ist es eine sehr einfach gehaltene, es sind alle bekannten Optionen möglich.
Fertig! Erste Gehversuche …
Ich habe in meinem Testsystem Hosts (10.44.4.5, 10.44.4.6) angelegt welche es nicht gibt um Meldungen zu generieren. Mit „tg_admin –show-notify-history“ kann man sich die letzten Notifications ansehen. Für jede Notification wird eine Callback_ID generiert. Die ID dient dazu wenn vom Telegram Client ein Callback aufgeführt wird z.B. Acknowledge eines Services den Callback eindeutig zu identifizieren.
Im Callback wird dann z.B. $$$CB$$$WCA38KSKU9XTODCO:ack gesendet für den Acknowledge von Host 10.44.4.5 / Service PING.
OMD[dev1]:~$ tg_admin --show-notify-history
ID  Callback ID         Host                Service                                 Datum               Chat_ID   Username
----------------------------------------------------------------------------------------------------------------------------------
232 WCA38KSKU9XTODCO    10.44.4.5           PING                                    2017-08-21 13:01:50 123456789 cmkadmin
233 T46ETYJ1CH7MV2ZS    10.44.4.5           Check_MK Discovery                      2017-08-21 13:01:54 123456789 cmkadmin
234 ADZJPKLMO0SV63WU    10.44.4.5           None                                    2017-08-21 13:02:02 123456789 cmkadmin
235 4WLYX43CGRJJQNHX    10.44.4.4           None                                    2017-08-21 13:12:13 123456789 cmkadmin
236 6OMRDN6DQ1KAIWY4    10.44.4.5           None                                    2017-08-21 13:12:16 123456789 cmkadmin
237 BUQ0HEAKPTFMLPED    10.44.4.5           Check_MK Discovery                      2017-08-21 13:31:11 123456789 cmkadmin
238 3QP6YL48RNWGJV4V    10.44.4.5           PING                                    2017-08-21 13:40:00 123456789 cmkadmin
239 7BKRA2ATVRHESFWH    10.44.4.5           None                                    2017-08-21 13:46:14 123456789 cmkadmin
240 1MZ2X50KJ55ZXA2W    10.44.4.4           None                                    2017-08-21 13:46:16 123456789 cmkadmin
241 N3RUH9EGYGJ314UU    10.44.4.6           PING                                    2017-08-21 13:47:16 123456789 cmkadmin
242 0273U5QDMDH2RFQA    10.44.4.6           Check_MK Discovery                      2017-08-21 13:47:18 123456789 cmkadmin
243 JZFJEUYOZAJ7U0VF    10.44.4.6           None                                    2017-08-21 13:47:29 123456789 cmkadmin
244 0YSN5ZG4DW80NGT1    10.44.4.6           PING                                    2017-08-21 13:48:13 123456789 cmkadmin
245 D436YY9GE3MLH00W    10.44.4.6           Check_MK Discovery                      2017-08-21 13:48:14 123456789 cmkadmin
Die empfangenen Callbacks werden in der SQL Datenbank gespeichert und werden hier von dem Programm tg_callback verarbeitet und die entsprechenden Aufrufe gegen Check_MK durchgeführt. Mit „tg_admin –show-callbacks“ lassen sich die angeforderten Callbacks und der Status anzeigen.
OMD[dev1]:~$ tg_admin --show-callbacks
Callback ID         Host                Service                                 Datum               Command   Executed
----------------------------------------------------------------------------------------------------------------------------------
OWQML2LFDZM8LIB3    localhost           Interface 1                             2017-08-18 23:58:49 ack       1
C6V7O11LAF65F5Q5    localhost           Check_MK Discovery                      2017-08-20 12:23:13 ack       1
P81F439ZX54ET4SG    10.44.4.4           None                                    2017-08-20 12:53:15 ack       1
CQHDP8OJFE4VTNHE    10.44.4.4           None                                    2017-08-20 13:04:06 ack       1
ZZ3OAVP41OPWE1PG    localhost           OMD dev1 Notification Spooler           2017-08-20 13:08:46 ack       1
2XKFHEVFGLB389QX    10.44.4.4           None                                    2017-08-20 13:34:00 down24h   1
916IUVV6O66GBDUA    10.44.4.4           None                                    2017-08-20 13:49:45 ack       1
916IUVV6O66GBDUA    10.44.4.4           None                                    2017-08-20 13:49:46 down24h   1
ZPAZ4OJ63CJ7IEM7    localhost           OMD dev1 Notification Spooler           2017-08-21 11:57:28 ack       1
ZPAZ4OJ63CJ7IEM7    localhost           OMD dev1 Notification Spooler           2017-08-21 11:57:29 down24h   1
ADZJPKLMO0SV63WU    10.44.4.5           None                                    2017-08-21 13:12:02 ack       1
T46ETYJ1CH7MV2ZS    10.44.4.5           Check_MK Discovery                      2017-08-21 13:31:02 ack       1
WCA38KSKU9XTODCO    10.44.4.5           PING                                    2017-08-21 13:39:49 down24h   1
ADZJPKLMO0SV63WU    10.44.4.5           None                                    2017-08-21 13:46:04 down24h   1
N3RUH9EGYGJ314UU    10.44.4.6           PING                                    2017-08-21 13:48:02 ack       1
0273U5QDMDH2RFQA    10.44.4.6           Check_MK Discovery                      2017-08-21 13:48:03 down24h   1
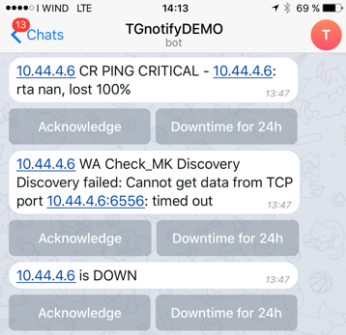
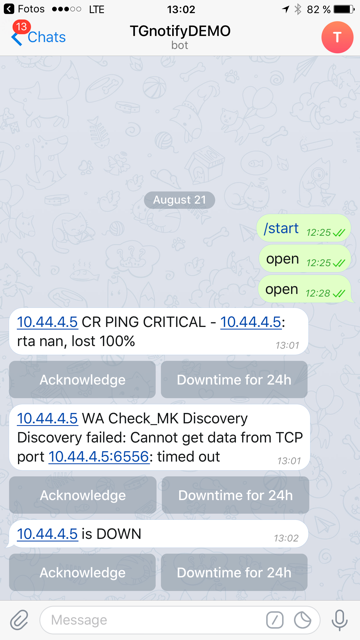
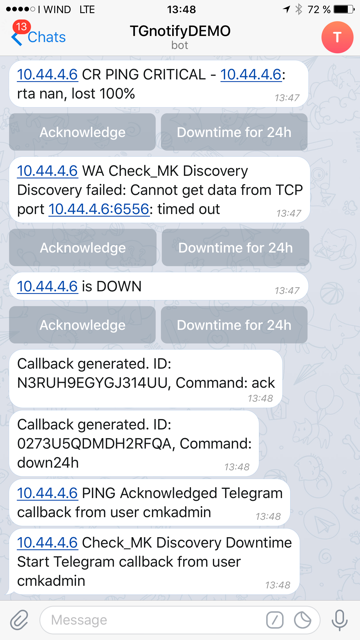
Die ersten Notifications sind am Client angekommen:
Jeder einzelne Service lässt sich ACKen oder für 24h auf Downtime setzen. Klickt man die Buttons an dauert es max. 1 Minute und TG-Notify anwortet das er den Callback empfangen hat.
